Super Spicy (not really) Salmon Spread!!!!

Hello all! I want to show you guys a simple little recipe that I created originally as a sushi roll filling, but I found out it tastes great as a spread on bread, tortillas, or whatever suits your fancy! Going to college in Iowa, I don’t have access to fresh fish so this recipe comes in handy when the only kind of fish I can get is from a can.

It’s finally time to break out that bottle of Sriracha! This is the star ingredient of this dish so don’t forget to pick up a bottle of this super delicious sauce!

Image

All the ingredients you need to make this yummy spread!

Ingredients

A can of Salmon

3/4 cup of Mayo

Sriracha Sauce

A handful of fresh Cilantro

Directions

First you’re gonna have to finely chop up that fresh cilantro and set that aside. Next, open up the can of salmon and drain all the liquid. You don’t want to have any extra fluids in this spread since it will settle into a unpleasant little pool on the bottom of the bowl if it sits for a while. After you put the drained salmon into a medium sized bowl, break up the salmon with your (clean) hands and remove the bones. Yes, canned salmon has bones and although they are edible, the texture of the bones does not compliment the spread well (and no it does not have to be perfectly bone free 🙂 ).

Next comes the easy part. Put your mayo and fresh cilantro into the bowl containing the salmon. The amount of Sriracha you put into this spread is completely up to you. I love spicy food so I usually put around half a cup of the stuff into the spread. The mayo really tones down the spicy quality of the sauce so feel free to go as crazy as you want with the Sriracha!  Once all that is in the bowl, mix with a fork until the spread is nice and creamy. I usually serve this with a couple slices of bread (sandwich bread or those baguettes you made from an earlier blog 😉 ). If you want to save the spread for a later time, just cover it up and throw it into a fridge for up to a week. If any liquid separates from the spread, don’t panic. Just mix with a fork until it’s well combined!

Image

The Spicy Salmon Spread served with some sandwich bread.

Homemade EASY Guacamole!

Mexican food is pretty damn tasty stuff! It’s pretty much everywhere and most college peeps get their fix from the school cafeteria or the local Taco Bell (yuck!). I started making this guacamole back when I was in high school. There was just nothing to do and I was hungry, so I went into the fridge, chopped up some ingredients, threw it all into a bowl, mixed it up, and low and behold I had really delicious guacamole! This is a very easy recipe with a fairly short ingredient list. Keep in mind that you don’t have to be exact with the measurements. Play around with the ratios until you find something that suits your taste.

Fresh Vegetables

Fresh Avocados, Tomatoes, Onions, and Cilantro are essential to making a great tasting Guac!

Ingredients:

4 Large RIPE Avocados

2 Small Tomatoes (or one large Tomato)

A Handful of fresh Cilantro

1 Small Onion

1 Habanero (Optional)

Any Grated Hard Cheese (Romano or Parmesan works well)

2 Tablespoons of Lime Juice

1 heaping Tablespoon of Minced Garlic

Salt and Pepper to Taste

Directions:

Take the Avocados and slice them in half and remove the large pit. With a spoon (or your hands 😉 ) scoop out the flesh and put it into a large bowl. With a potato masher or a whisk, obliterate the avocados until it turns into a smooth green paste (There will be lumps and that’s totally fine).

I usually have my roommate do all the manual work so in the meantime, I diced the onion and tomatoes into small pieces and minced the cilantro. If you love spicy food (like I do) then go ahead and take the Habenero (this can be replaced with Jalapenos or Serranos) and mince that as well. Please please pleaseee don’t rub or touch anything for a while after coming in contact with any of these peppers. It will burn… and hurt… a lot.

Now that all the prep is done, here comes the easy part! Throw all that stuff you just chopped up (The onions, tomatoes, cilantro, and peppers) into the bowl containing the avocado puree. Add the minced garlic lime, lime juice, and about a 1/4 – 1/2 cup of the grated cheese. Italian cheese might be a weird thing to put in a Mexican condiment, but I find that it adds a very nice salty and rich taste without overpowering the actual flavor of the guacamole itself.

Throw all the ingredients into the bowl...

Throw all the ingredients into the bowl…

And now….. MIX!

Until well combined of course!

The only salty component of this recipe is the cheese so the guacamole may be a bit mild at first. That’s why we have salt and pepper 😉 . Add to taste.

Congrats! You have successfully made your first batch of fresh, healthy and all natural guacamole! This is best served chilled and can be eaten with a side of warmed tortillas, chips, or if you are feeling fancy, you can make some tacos and top them with your super tasty out-of-this-world guacamole! Happy cooking!

Guacamole served with quartered tortillas

Guacamole served with quartered tortillas

Making Bread! (Le Baguette)

Bread is an amazing thing. It is cheap, filling, and not to mention very tasty! I used to buy bread from the local supermarket all the time, but after learning about how delicious and relatively easy it is to make your own bread, my life has never been the same (A bit overstated I know, but quite true nevertheless 🙂 ). It’s actually quite surprising to see how far four simple ingredients can take you and with some patience (and a little bit of practice), you will be baking superior loaves of bread in no time!

French bread (Baguettes) are my favorite type of bread. Maybe I’m just sick of sandwich bread since my parents used to buy it all the time, or maybe it’s that unique thick crust and that moist, fluffy interior. Despite the simplicity of the ingredients, the taste is phenomenal. You can use this bread to make a gourmet sandwich or slice it up and eat it with butter, jam, or meat (maybe even all three if you are feeling adventurous 😉 ). You could even just rip off a piece and eat it plain! The recipe I use is based on a blog I read a couple of years ago. I couldn’t get over the appearance, smell, and taste of the simple and traditional baguettes created from this recipe.

To make these baguettes, I recommend you invest in a baguette pan. It will help develop the crust of the bread as well as aid in even heat distribution. A normal cookie sheet can be used, but make sure it is long enough (around 12 inches). This recipe will require you to let the dough sit overnight so prepare accordingly (don’t procrastinate!). Also, I will warn you in advanced, be careful when pouring water into the steam pan during baking. It will splatter.

998637_10201001038283007_1262065648_n

The recipe yields four baguettes

Ingredients:

5 1/2 cups bread flour (Unbleached)

2 tsp salt, or tbsp kosher salt

2 1/4 tsp instant yeast (one packet)

2 cups lukewarm water

Directions:

Combine flour, and salt in a large bowl. Take about 1/4 cup of the lukewarm water and mix the yeast into it. When the yeast/water mixture begins to foam (around 10 minutes) pour the rest of the water and the yeast mixture into the flour. Mix with a spoon (or your hand) until the dough forms a coarse, shaggy ball. Let rest for 5 minutes. Knead the dough on a lightly floured work surface until it is smooth, supple, and tacky (not sticky). Transfer to a large lightly oiled bowl and refrigerate immediately overnight or up to four days.

Remove dough from refrigerator 2 hours before baking and divide it into 4 even pieces. Don’t manhandle the dough. You want to try and keep the dough as puffy as possible.

To form the baguettes, shape each of the dough pieces into a thick rectangle. Fold the top and bottom halves of the dough to the middle and seal the seam. Fold the dough in half along the seam you just created and seal the new seam at the bottom of the loaf. Rock the dough back and forth and stretch it to the desired length (around 12 inches or the length of the baguette pan).

Brush the top of the loaves lightly with oil (I usually use olive oil) and cover loosely with plastic wrap. Let the formed loaves rest for about 1 1/2 hours or until the loves have increased 1 1/2 their original size. Take care to leave enough space between the loaves to prevent them from sticking to each other.

formed dough

I used a large, clean, floured cloth to form “dams” that help separate the dough when rising.

Around 45 minutes before baking, preheat your oven to 450 degrees. Place a cookie sheet (this will serve as your steam pan)  under the rack the baguettes will be baked on. 15 minutes before baking, take the rested loaves and roll them gently onto your baguette pan and score the tops with a very sharp serrated knife or razor 1/2 inch deep. Transfer the loaves to the oven and very carefully take a cup of water and pour it onto the hot pan in the oven.

20051018002scoring

Photo Credits: Floydm

Bake for 10-12 minutes then rotate the pan (to ensure even baking) and bake for another 15-25 minutes or until the crust is golden brown and the loaves sound hollow when thumped. The internal temperature should be around 200 degrees in the center. Before you start slicing up the bread and going crazy, make sure you let it cool for at least 35 minutes or else the bread will break apart when you cut it. It is recommended that you eat this the same day you make it, but if you are like me and like saving food, you can freeze the bread until you need it.  Simply pop it in a 350 degree oven for 5-10 minutes whenever you get those bread cravings!

First Official Post! What to keep around the kitchen!

Hello again and welcome to my first official blog post! Before I dive into all my favorite things to make at college, I want to share a couple versatile ingredients that I like to keep around the kitchen. Having these ingredients around will save you many needless trips to the local supermarket in the future so listen closely!

Image

Photo Credits: Maris Callahan

FLOUR

You’ve probably seen this white powdery stuff lying around in your grandma’s kitchen, and it should be something you keep in your college apartment as well. Flour is an extremely versatile ingredient that has many purposes. Aside from being the main ingredient in breads and cakes, it can be used as a natural thickener. Just throw a tablespoon or two of flour into a pot of watered down soup and it will thicken up quite nicely (Don’t forget to add salt!). Surprisingly, flour has many uses outside of cooking. Some of which include making modeling clay, dry shampoo and even putting out grease fires! I usually make sure to keep a 5 pound bag in my pantry. Just be careful to store it in a cool dry place.

sugar

Photo Credits: ABC News

SUGAR

Sugar makes the world go round. It’s an ingredient used in almost every recipe, and yes, not just sweets. There are many forms of sugar that fall under three main categories: White, brown, and liquid. The types of sugar I usually keep in my pantry are the standard white granulated sugar and brown sugar. If you like making cakes that require icing, then you should keep some confectioners/powdered sugar at hand.

Image

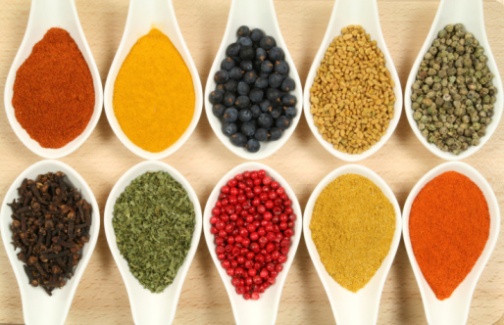
Photo Credits: Rumormillnews.com

SPICES

This is a pretty large category since there are so many different types of spices out there in the world. Although it would be ideal to have as many different spices as you can in your spice cabinet, it’s pretty hard to do considering that most of you guys are broke college students. Aside from salt and pepper, which you should always have somewhere around your kitchen, a few versatile spices I like to keep at hand are cayenne pepper, garlic powder, oregano, dried basil, paprika, cinnamon, nutmeg, thyme, parsley, onion powder, Chile powder, and red pepper flakes. This is a pretty large list, but I assure you, having these spices around will open many possibilities for the types of recipes you can make.

Image

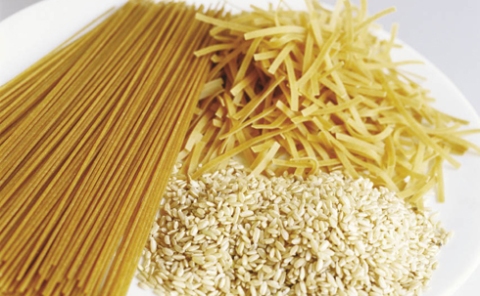
Photo Credits: Denise Shoukas

DRIED PASTA AND RICE

I can’t tell you how many times this stuff saved me from starving after not going grocery shopping for a couple weeks. Not only are these dried carbs filling and nutritious, they are relatively cheap and last forever (if you are careful to store the stuff in a dry place). You can go ahead and cook up some plain pasta or rice, or you can make a delicious meal by adding a couple more extra ingredients. I’ll show you some of my favorite pasta and rice dishes in my future blogs so make sure to stay tuned!

Image

Photo Credits: Clayton South

VEGETABLES

Fresh or frozen, vegetables are a major element in many different recipes. You can go to the local supermarket and pick out some fresh veggies to cook with or simply munch on for a healthy snack. Potatoes, onions, green onions, carrots, and celery are usually sitting around my kitchen somewhere. In the freezer, I keep a bag of frozen vegetables (usually consists of peas, carrots, and corn) at hand whenever I need to make something like soup or fried rice.

ground_beef

Photo Credits: Buckleyfarm.com

MEAT

Of course, you can never forget the meat (unless you’re a vegetarian). Ground beef and chicken (Ground or breast form) are the types of meat I usually keep at hand since most recipes require, or can be used as a substitute for another meat, chicken or beef (maybe even both). There are many different fat levels of ground beef. The more lean the beef is, the healthier and more expensive it is. Personally, I like buying 80 percent lean and 20 percent fat since it seems to be the most reasonably priced (per pound) and it’s not terribly unhealthy. As for chicken, there are not many options for ground, but when I buy chicken breasts, I usually go for the prefrozen variety since it’s cheaper and the difference in quality from fresh chicken is not very noticeable. Whenever you buy meat and you know you are not going to use it for a while, simply put it in the freezer. Just remember to place it back in the fridge a day before use so it has time to thaw.

cilantro

Photo Credits: Vikas Khanna

FRESH HERBS

Like spices, there are a large variety of fresh herbs available. I don’t really buy fresh herbs since the dried spices I have are usually sufficient. I do, however, always have fresh cilantro. The dried stuff just doesn’t cut it. The taste and aroma of fresh cilantro is simply irreplaceable. Whenever you get the chance, just swing by your local grocery store and pick up a bunch of fresh cilantro! Hopefully you’ll appreciate the taste as much as I do.

Image

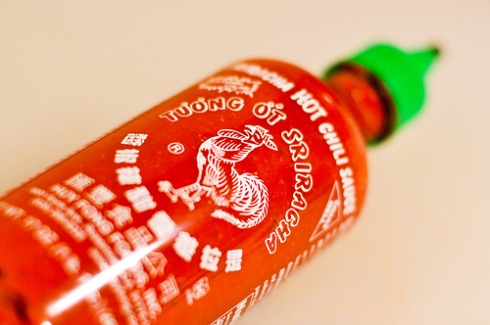
Photo Credits: Joshua Bousel

OTHER STUFF

Other things you can have in your kitchen are some premade sauces and condiments. There is one condiment in particular that I just can’t get enough of. It’s a bright red sauce in that iconic clear bottle with a pointy green cap. You guessed it, Sriracha! It’s a spicy, garlicy chili sauce that compliments many dishes ranging from pizza to sushi. Not only is it a great compliment to many dishes, it can be used directly in many recipes to add some extra heat and flavor.

Having all these ingredients at hand will make cooking in your college apartment much less of a hassle. Also, don’t be afraid to buy the off brand stuff. It’s not just cheaper. Most off brand products are indistinguishable from the name brand stuff so go ahead and choose that off brand box of pasta. You will end up saving a hefty sum of money once you get the hang of shopping efficiently.

Hey Guys!

Image

Bread is an example of something easy, cheap, and delicious to make!

        I’m excited to announce the start of my new blog that will share my experiences with food and cooking at college! One of the first things many college kids, including me, are worried about is money. It’s just hard to come buy when you have to spend it all on text books and tuition. You guys are probably thinking how in the world do you have enough money left to buy ingredients and cook? Surprisingly, buying the right ingredients and cooking your own meals can save you a hefty sum of money, as opposed to just eating meals provided by your school. Cooking may also sound like an intimidating thing to many of you. Even if your experience with cooking may only consist of throwing a package of ramen into a bowl and heating it up in that trusty old microwave, with a little practice, you’ll be surprised by the delicious (not to mention healthy) meals you can make! I’m here to share with you some tips and tricks as well as my favorite recipes I use when cooking in my college apartment. All you guys need is an open mind and an empty stomach. Let’s begin!